Using Prefab
Adding to Scene
Prefab is the fastest way to integrate a web view to your project. You can find UniWebView.prefab under UniWebView/Prefab folder in your project. Drag it to the scene you need to show a web view. Then you can configure properties of UniWebView component in the Inspector Tab.
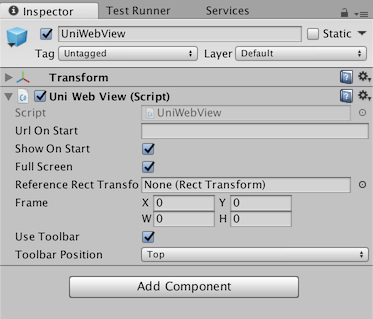
For now, you could just type your web page URL into the "Url On Start" field (eg. "https://uniwebview.com") and leave others as default. Click "Play" button in Unity Editor and now you should be able to see the web view opened and the page is loaded. You could also build it to an iOS or Android device to see how it works in the real world!
Here is a detail explanation of these properties:
Url On Start
The URL which will be loaded in Start() of UniWebView. A normal web URL started with "http://" or "https://"is supported.
Show On Start
Show the web view in Start() of UniWebView. If false, the web view will not show up automatically. You need to call Show method of the web view to display it.
Full Screen
Make the web view be full screen at start. If true, the "Frame" and "Reference Rect Transform" below will be ignored by default.
Reference Rect Transform
UniWebView could refer to a RectTransform and change web view size to follow that transform. It is very useful if you are using Unity UI with Multiple Resolutions support. You can just create a UI element (like a Panel) under your Canvas to let it determine the position and size of your web view. Similar to the "Full Screen" option, setting "Reference Rect Transform" will make "Frame" option ignored.
Frame
Set the rect frame value for the web view. It is a Rect which indicates web view's origin point and its size as: {x, y, width, height}. If you need a fixed-size web view regardless of the screen size is, you could uncheck the "Full Screen" option, leave "Reference Rect Transform" to null and set "Frame" instead.
Use Toolbar
This is only for iOS and macOS Editor. By turning this on, a toolbar contains Go Back Button, Go Forward Button and Done Button (iOS only) will be shown with the web view. Your user could use this toolbar to navigate and close the web view. On Android, users could use the back button in the navigation bar to perform "go back" and "close" operation, so there is no need to supply a toolbar for Android.
Toolbar Position
If "Use Toolbar" is on, UniWebView will show the toolbar in the position specified by this. It only works for iOS, since on macOS the toolbar will always show in the window title bar.
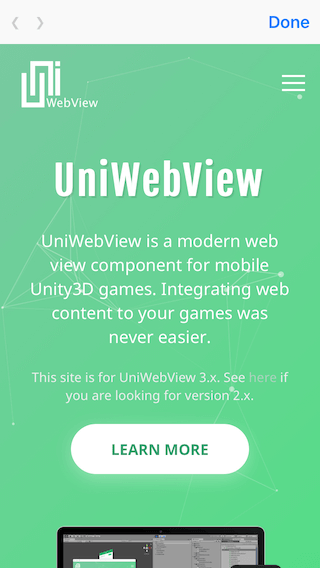
Here is what it would look like when opening in an iOS device:
Instantiating at Runtime
Instead of adding the prefab to the scene before running it, you can also instantiate it at runtime. So you are able to control the showing of a web view as you need. There is nothing different from instantiating a UniWebView prefab than any other normal prefab. Please refer to Unity's documentation to know more about this topic.
Once a UniWebView gets closed by Done Button or Back Button, it will destroy the component itself by default for releasing resources as soon as possible. You will not be able to reuse the same UniWebView. You need to create a new UniWebView if you want to display another page. Don't worry if you are not sure what does that mean. We will explain this behavior in the memory management section later.
Next Step
It is fairly easy to add a web view by using the UniWebView prefab. However, the functionality provided is quite limited. To get benefit from all features of UniWebView, you have to write some code. We have a set of elegant and simple APIs as well as an exhaustive guide. So even you have no experience in coding before, it should be not hard for you to write the script to control UniWebView fine. Follow the Working with Code chapter to get your hand dirty now! 💦