Installation
Important
We strongly recommend that you perform a backup before importing UniWebView to your project. If you are using any version control system (like Git or SVN), it should be definitely safe to continue.
Unity Asset Store
If you purchased UniWebView from Unity Asset Store, open the Asset Store window from Window → Asset Store. You could search for UniWebView 3 there, then download it and click the "Import" button.
UniWebView Store
Besides of Unity Asset Store, we also have our own store. After purchasing from our store, you could download the uniwebview_x_y_z.unitypackage file of UniWebView (x_y_z in the file name means the package version is x.y.z). Open your project in which you want to use UniWebView first, then double-click the downloaded file to import it.
Importing Package
No matter in which way you import UniWebView, Unity would prompt you with a window to confirm the importing files.
The integration approach has been changed from version 3.7.0, so you need to check your UniWebView version and follow the corresponding steps. If you are upgrading your UniWebView from 3.6.x or earlier, please read Adapting to AAR File instead. If you want a fresh installation to your project, choose either UniWebView 3.7.0 and later or UniWebView 3.6.x and earlier below:
UniWebView 3.7.0 and later
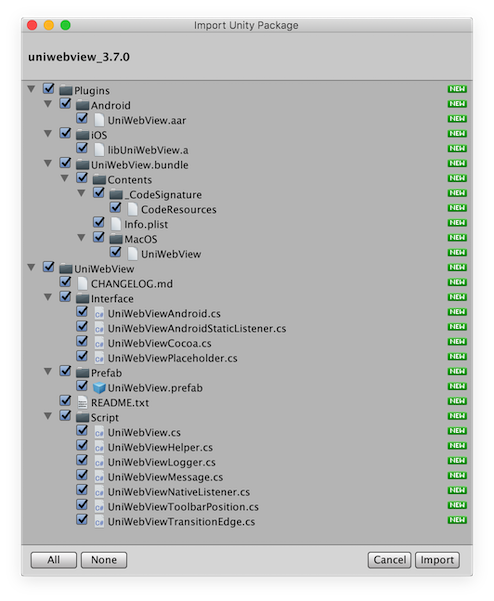
From UniWebView 3.7.0, we adapted to AAR based library for Android. It will simplify the importing dramatically. The importing dialog looks like this and you should import everything into your project:
Manifest File
There is no need to do any modification to your AndroidManifest.xml, either you have one or not. UniWebView will handle its own need and Unity could merge the main app manifest to UniWebView's one. So by now you should be ready to continue to the next step.
Optional Steps
Depending on your use case, you may need to add more permissions to the manifest file. For example, you may need ACCESS_FINE_LOCATION if you want to use location service in the web view, or WRITE_EXTERNAL_STORAGE if you want to choose or capture a photo to upload (since a temporary file will be created in the disk).
If you have an AndroidManifest.xml in your project under Assets/Plugins/Android folder, you could add it next to </application> tag:
</application>

<!--Access Internet for web content-->
<uses-permission android:name="android.permission.ACCESS_FINE_LOCATION" />
<uses-permission android:name="android.permission.WRITE_EXTERNAL_STORAGE" />
If you don't have AndroidManifest.xml in Assets/Plugins/Android, you could copy the default one used by Unity from ${UnityPath}/PlaybackEngines/AndroidPlayer/Apk, and paste it to your project. Then you could do the same modification to add additional permission.
UniWebView 3.6.x and earlier
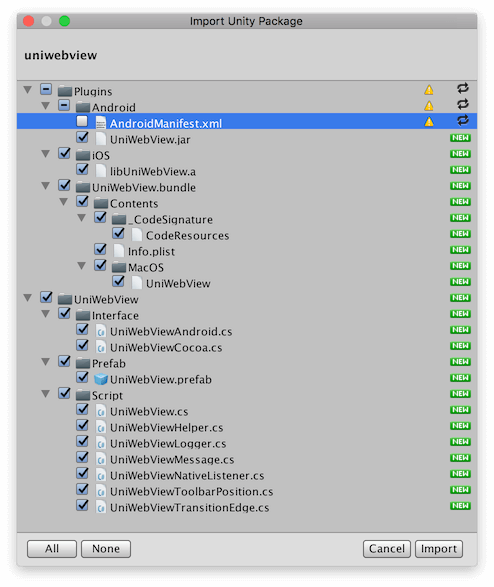
There should be no conflicting for those files unless you already have an AndroidManifest.xml in your project under Assets/Plugins/Android. If it shows a yellow warning mark for AndroidManifest.xml, you could uncheck it to keep your current version for now. We will describe how to modify the manifest file in next section.
The files might not be the same as they were in the image above. You should always import everything under
PluginsandUniWebViewfrom the package. When Unity's tools exporting the UniWebView package, there is a chance to contain some other files. But it should be safe to ignore any files if they are not underPluginsorUniWebView.
Manifest File
AndroidManifest.xml is used to describe some meta information for the Android target. If your project does not contain a manifest file before, the one you imported with UniWebView will be used. Otherwise, you should keep your original one and do some modification. Open the Assets/Plugins/Android/AndroidManifest.xml file with your favorite text editor and follow the steps below:
- UniWebView needs
hardwareAcceleratedto betrueto have a good render performance and play videos. Find your current main activity (the one withandroid.intent.action.MAINfilter) and addandroid:hardwareAccelerated="true"in the<activity>tag if it does not exist yet. Here is an example of modified main activity:
<activity android:name="com.unity3d.player.UnityPlayerActivity"
         android:label="@string/app_name"
         android:hardwareAccelerated="true">
         <!--Web page and video accelereate for UniWebView-->

   <intent-filter>
       <action android:name="android.intent.action.MAIN" />
       ...
   </intent-filter>
   ...
</activity>
- UniWebView needs an additional activity to open file chooser if you need to upload a photo from a web page. Add the
UniWebViewFileChooserActivitydeclaration just above the</application>line:
    ...
    </activity>

    <!--Image file chooser activity for UniWebView-->
    <activity android:name="com.onevcat.uniwebview.UniWebViewFileChooserActivity" />
</application>
- Add permission for using the Internet if you need to access web content. This is not needed if you only use UniWebView for local files. Add the
INTERNETpermission line just the next line below</application>:
</application>

<!--Access Internet for web content-->
<uses-permission android:name="android.permission.INTERNET" />
- Other permissions. Depending on your use case, you may need to add more permissions to the manifest file. For example, you may need
ACCESS_FINE_LOCATIONif you want to use location service in the web view, orWRITE_EXTERNAL_STORAGEif you want to choose or capture a photo to upload (since a temporary file will be created in the disk).
Restarting Unity
You need to restart your Unity Editor to load UniWebView bundle for macOS Editor. Also remember to switch your build target in player setting to either iOS or Android, since UniWebView will only work on these two platforms.
Next Step
Congratulations! You are prepared to use UniWebView in your project now. Please read next chapter to know how to use the simplest prefab way to show a web page.